Saturday, 3 January 2015

Lightning Connect and SQL Integration Real Time Using Windows Azure Cloud Services-Part 1

Back Office Real Time Integration is need for any Enterprise Applications residing on salesforce platform .One of Key challenges of Salesforce Enterprise customers have been how to show data in salesforce 1 platform from back office or third party systems  without actually storing or consuming the storage space .

Salesforce External Object and Lightning Connect solves this .If you are not so familiar with External Objects ,I would recommend below links for further understanding

http://www.slideshare.net/developerforce/df13-using-external-objects-for-integration-mt
http://www.tquila.com/blog/2014/11/11/what-salesforce-lightning-connect-and-external-objects
http://www.tquila.com/blog/2014/11/17/setting-lightning-connect-and-your-first-external-object
http://reidcarlberg.com/2014/11/20/simple-salesforce-lightning-connect-example-external-objects/
https://blog.heroku.com/archives/2014/11/13/heroku-external-objects

All of the above blog links are really good and they explain Odata in particular .Lets take some time now in exploring whats Odata

OData

The Open Data Protocol (OData) is a data access protocol built on core protocols like HTTP and commonly accepted methodologies like REST for the web.

Standardization of OData has been going on for years (they are working on version  4), but it has suffered from a bit of a chicken-egg problem. Applications haven’t put a large priority on supporting the consumption of OData because there haven’t been enough OData providers, and data providers haven’t prioritized making their data available through OData because there haven't been enough consumers.

With the above theory and concepts now we are set to use windows azure cloud services to set up a SQL server and expose data and metadata in SQL as Odata service .we will use salesforce lightning connect to connect to this web service and see the data in SFDC .We will create Tab in SFDC and view the data .Sounds Interesting and exciting as well .Lets carry on !!!

Creating a SQL table and adding data using windows azure cloud services

I started my career with salesforce and cloud so I love to be working with only cloud platforms .windows azure is a microsoft cloud platform.Azure is the only major cloud platform ranked by Gartner as an industry leader for both infrastructure-as-a-service (IaaS) and platform-as-a-service (PaaS). This powerful combination of managed and unmanaged services lets you build, deploy, and manage applications any way you like for unmatched productivity.

I signed up for free trial with the help of below link

http://azure.microsoft.com/en-in/pricing/free-trial/


If you don't have windows account ,you will need to create one to complete the sign up.Please note it does ask for credit card info but you are not charged any amount from that.

Once you sign up the windows azure you will be able to explore and create various services .Below picture shows management portal of azure platform


The New button exists throughout the Windows Azure Management Portal and will enable you to provision new services within your Windows Azure subscription. This button is also context aware, so if your focus is currently within the SQL Database service, clicking this button will default the selections for creating a new Windows Azure SQL Database.
Click on the New button. You should now be presented with a menu to create a new Windows Azure SQL Database. Notice that the menu has a list of the Windows Azure service categories on the left, followed by the services within the selected category, and options for creating your new service in the third column. ClickCustom Create to begin setting up your Windows Azure SQL Database.
Click Custom Create
You should now see the New SQL Database – Custom Create wizard.
New SQL Database – Custom Create wizard
In the Name text box enter Websites.

In the Subscription drop down, select the Windows Azure subscription where you would like to create your SQL Database.

1)In the Server drop down, select the Windows Azure SQL Database server that you would like to use for your new database. If you have created a Windows Azure SQL Database server previously, you can select that server, otherwise, select New SQL database server.
2)The remaining fields you can leave set to their defaults.
3)Click the checkmark in the lower right corner to advance to the next step in the wizard.
4)If you chose to create a New SQL database server, you should now see the SQL Database server settings screen.
5)In the Login Name text box, enter the user name you would like to use to login to your SQL Database.
6)In the Login Password and Confirm Password text boxes, enter the password you would like to use to login to your SQL Database.
7)In the Region drop down, select the Windows Azure data center where you would like your new SQL Database server provisioned. For optimal latency and cost of data transfer between data centers, it is recommended that you provision all of the services for an application that are dependent on one another in the same data center.
8)Lastly, leave the Allow Windows Azure Services to Access The Server check box checked. This will allow other services in Windows Azure, like the Windows Azure Web Site that we will create in future steps to access your SQL Database.
leave the Allow Windows Azure Services to Access The Server check box checked
After you have provided all of the details for your new SQL Database server, click the checkmark in the lower right hand corner to finish the wizard and create your database.
 You will see progress in the toolbar at the bottom, and once your database has been created, you should see a success message like the following. 
Click the OK button in the notification bar to dismiss the message.
Click the OK button in the notification bar
Once your database has been successfully created, go ahead and click on the Name in the list of databases, which will display information about your database and additional options and configuration.

The next thing we need to do is configure access to your SQL Database. By default, Windows Azure SQL Database firewalls all IP address from connecting to your server. As a result, you need to grant access to connect and manage your server. To grant access to your IP, click on Set up Windows Azure firewall rules for this IP address.
Set up Windows Azure firewall rules for this IP address
Your database is now ready! So now you are ready to add some tables and data.

Creating Tables in Your SQL Database

While on the home screen of your SQL Database, click on the Manage button in the toolbar at the bottom.
click on the Manage button
This will display the SQL Database Management Portal login screen. Enter the username and password that you used when creating your SQL Database and click the Log on button.
SQL Database Management Portal login screen
Select your newly created Table1 database and click on the Design button in the menu on the left.

You should now see options to design the schema of your database including Tables, Views and Stored Procedures.
Click on the New table button in the middle of the screen.
Click on the New table button
1)Enter Table1 in the Table Name text box.
2)On the ID column that was added by default, check the Is Identity? check box.
3)On the Column1 column that was added by default, enter FirstName under Column, leave the defaults forType set to nvarchar and the Length to 50.
4)On the Column2 column that was added by default, enter LastName under Column, leave the default for Typeset to nvarchar and set the Length to 50.
Click the Save button in the toolbar at the top to save the Person table.
Click the Save button

Adding Data to Your Database

Now that you have the structure of our database setup, it is time to enter data into your tables. The same web-based SQL Database Management Portal that you used to setup the structure and schema of your database, you can use to add data to your database.
To begin, you will add data as shown

Now that your table is selected, click on the Data tab at the top and a list of rows from the Table1 table will be displayed. At this point, the list of rows should be empty, because you should have an empty table.
Click the Add row button to add a new row to the Person table.
Click the Add row button
The ID column is setup as an identity column and it will get automatically incremented and assigned when a record is added, which means you should leave this column blank.
Enter some text in the FirstName column.
Enter some text in the LastName column.
Repeat these steps two more times to add fields to the  table. 
Once finished adding rows to the table, click the Save button in the toolbar at the top to save your new rows to the table.
Now that you have fields  in your table named websites, you need to add Items to their Shopping Lists.
Click on the Item table in the menu on the left.

Click on the Data tab at the top and an empty list of rows from the Item table will be displayed.
Click the Add row button to add a new row to the Item table.

Once finished adding rows to the Item table, click the Save button in the toolbar at the top to save your new rows to the table.
Congratulations! You have now built a database and stored data in the cloud!
Now that you have people in your Person table and shopping list items in your Item table, you are done setting up your database and can now close the SQL Database Management Portal and move on to building your web service and application.

Summary

If you followed along with this article, you just:
1. Created a database in the Cloud using Windows Azure SQL Database
2. Set Up a table and defined your database’s schema
3. Added data to your database using the web-based SQL Database Management Portal
Next blog will demonstrate on how to expose this SQL table as an ATOM feed and then use lightning connect to display data .


Thursday, 1 January 2015

New Year Resolution For 2015 As A Salesforce Developer

First and foremost HAPPY NEW YEAR 2015 to all !!! Last year for me as a salesforce developer has been great .I authored a book "Salesforce Essentials For Administrators" last year and I hope that was interesting read for new admins .

As a developer learning is an important part in our career .Salesforce is adding lot of new and exciting features to its platform and following is my learning calendar for year 2015 .

Analytics Cloud

Analytics cloud platform was launched last year in Dreamforce and I expect it to go big in coming years .Last year I took few important steps to understand this and this year the plan is to go hands on .Last year I completed two important trainings 

1)White Belt Trainings
2)Green Belt Trainings

This year I will be attending the brown belt training on analytics cloud .If you are a partner Organisation to salesforce ,this training is offered from salesforce for free in form of classroom.I am attending one in Bangalore from 5th Jan to 7th Jan.

Marketing Cloud

In Dreamforce salesforce launched its marketing cloud products like Journey Builder and Pardot that excites me .In fact I see a certification from salesforce for Pardot .I am eager to prepare for this certification this year as I learn and explore Pardot .

Journey Builder looks promising and I will be going hands on to explore more .

Lightning

This is very broad and needs to be split into various component

1)Lightning Connect
  
I will be blogging on this soon ,where I am planning to integrate SQL server with windows Azure cloud and using lightning connect to pull the data in real time

2)Lightning Component

Salesforce has provided new developer guide for this new UI framework .The below is the page from where one can obtain PDF of these guides

https://developer.salesforce.com/lightning

Last year I went through this guide and never went hands on .This year ,will be working and blogging on this framework.

3)Salesforce Lightning App Builder(BETA in Spring 15)

Salesforce Lightning App Builder is available in pilot from spring 15 release and will be exploring this builder to find art of possibility.

4)Salesforce Process Builder(GA in Spring 15)

Salesforce Process Builder is available from spring 15 and this will be interesting as I expect less of apex due to its excellent features to do business logic like creating records ,looping over the data ,bulk updates and so on.

5)Community Builder

Last year one of my blogs demonstrated this builder when the product was in BETA and now its GA .If you are interested in the blog ,below is the link for same

http://cloudyworlds.blogspot.in/2014/11/learn-how-to-use-salesforce-communities.html

JAVASCRIPT LEARNING

Last year I loved working with Jquery but with Angular being adopted quickly ,this year I will continue to work more on angular .

Angular makes two way  data binding easier.I blogged lot of articles on this last year and this year I will be going more hands on with this framework .Google has been making continuous improvements and to keep up-to speed its  important to keep reading articles and doing some small projects as a part of learning .

Polymer

This year I have made resolution to explore Polymer and at least build some POC projects around this framework.

Spend Time On TrailHead

https://developer.salesforce.com/trailhead

Unfortunately have not managed to spend my time on trailhead and I expect some time in coming months to do a dedicated learning here . 

Certifications

Following are certifications that I target for this year

1)Salesforce Technical architect board review (Last year I completed multiple choice and this year will be attempting board review.I am targeting at mid or to the end of the year )
2)Brown Belt on Analytics Cloud 
3)Pardot Certification(http://certification.salesforce.com/pardot)

Community Service

I will spend at-least half an hour daily on Stackexchange. I have learnt most from this community and keep contributing my best here .

Will blog atleast 2 articles per month on upcoming release feature on salesforce platform and new technologies on my own blog .

Once again wish you all  "HAPPY NEW YEAR " and may the force be with you and don't force yourself for anything ,Keep spreading and sharing  knowledge and loads of love :)

Sunday, 30 November 2014

Custom Star Rating Component Using Visualforce In Salesforce

Have you ever met with a requirement where you had to Rate list of records in salesforce and store the ratings related to Individual user and then do an average rating based on rating for all users for the records ?The records that I refer  to may be your custom objects ,or leads or may be your Accounts or opportunities .Providing ability to Rate records is one of the common requirements if you are building a site where you showcase your products .Salesforce knowledge article provides this facility but the solution we will do here will be rating custom object or standard object and we assume you don't use knowledge module for your purpose .

Our approach will be to use a simple plugin that I liked very much and special thanks to the actual author who has developed this plugin Kartik Visweswaran.I salute his work and my work is just integrating his work with salesforce Visualforce Page .

Lets get started with simple demo that he has hosted on his site ,the demo link is as below

http://plugins.krajee.com/star-rating/demo

Lets quickly grab his plugin from the github repo .

Assumptions for this work

I have created a Junction object between user and Account and have named it as Account Rating .The Account Rating object has a custom field created of number type Rating to store the rated no from visualforce interface

Visualforce Code 

We will import all the jquery,CSS,bootstrap plugins into the static resource and reference the same in the VF.The entire code is as shown below


The meat of the code above is how we have used script to call javascript remoting function to upsert the junction object

Apex Code


Let me take some time in explaining this on what we have been doing here,

The Input HTML-5 tag has a javascript that detects when the rating changes .Once the rating star is clicked we call js remoting to upsert user rating for the Account.The demo page appears as below link .Note I have kept code very simple .and may be once I have time i will enhance this to make it generalized for any object and fields.

http://webzone-developer-edition.ap1.force.com/webzone/RatingDemo
I have made a small unmanaged package in case you want to pull this and play in your org to see how this goes

Use this URL to install the package into any organization:
https://login.salesforce.com/packaging/installPackage.apexp?p0=04t90000000FNdn

Note: If you are installing into a sandbox organization you must replace the initial portion of the URL with http://test.salesforce.com

Also a small video I have attached to explain the functionality clearly .Also note from karthik demo you can add all style elements .Check his demo page for more styling .The attributes can be configurable as well


Enjoy coding .....

Sunday, 9 November 2014

Learn how to use Salesforce Communities Designer for Self Service Portal


Salesforce community portal have been in use for long time, but was limited in offering pleasant features and specially custom configuration. To introduce as new feature, lot of additional works needs to be done, both from development and design perspective, which include using HTML, CSS and Javascript on top of Visualforce.


Clearly powerful user-experience and clean user interface adds high user engagement. In person, we have spend weeks to leverage an impactful customer experience with Salesforce Communities


Salesforce introduced community designer and have fascinated me in person, I have been working on this platform for about three year, and I find this tool be very productive. I teamed up with +Harshit, and decided to write this blog post here explaining how to Salesforce Community Designer Tool released in Winter'15.


To explain a functionality, I am choosing a business scenario, covering business activity in an financial institution, and covering mundane activities like resolving credit-card/loans issues. My objective is to explain this all with no-code, and rather deal everything with 'Point and Click'.

Prerequisites

1) Lets set up a developer org . sign up for an org from developerforce.com


2) If you are not familiar with communities, we recommend reading this setup guide here .


3) Knowledge articles is the soul for this whole set up. Get some coffee and go to this setup video here


Having installed Prerequisites (Note : three of mentioned resources, are mandatory) , we will look up Salesforce Community Builder and Templates, to set up Self-Service Portal


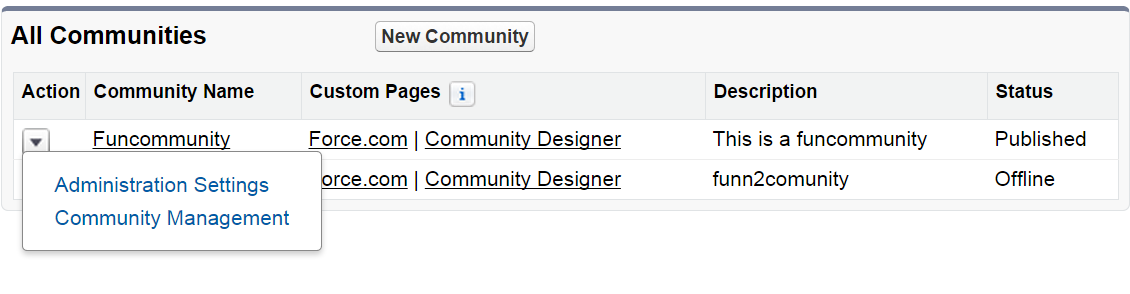
Navigate to Set up>Communities>All Communities


Note : As shown in picture above, two new additional setting are introduced as  ‘Administration Settings’ and ‘Community Management’


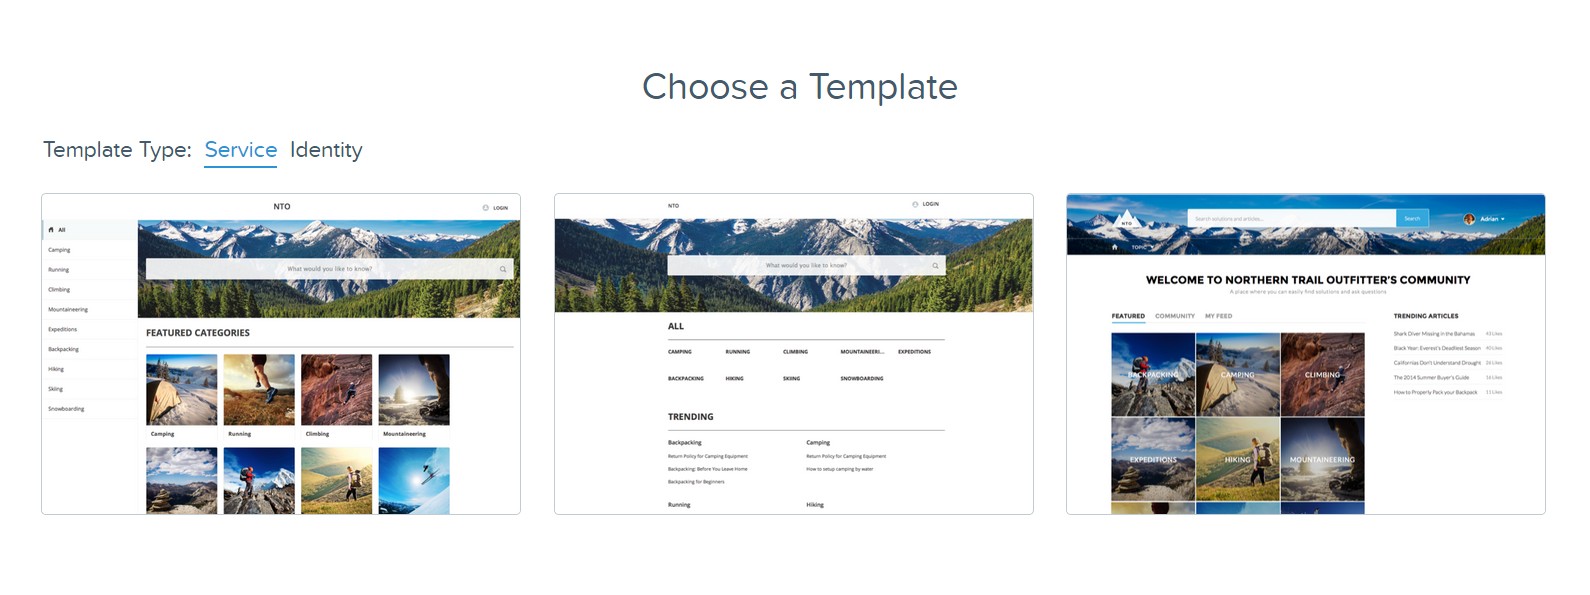
Salesforce Community Templates

Primarily, three important templates available to jump start, but I would like to share the amenities, each templates offer, and make choice easier for you.


1) Kokua - Uses data categories, case and Salesforce Knowledge.
2) Koa- Designed for Mobile, features include, articles search and case management.
3) Napili- Offer most features, with Q&A, Knowledge Articles and Case Support. Clearly, I’ll use this template moving forward


Pickup template of your choice, In here, I have created a community named ‘FunCommunity’ as you can see in drop-down,


Setup Navigational Topics

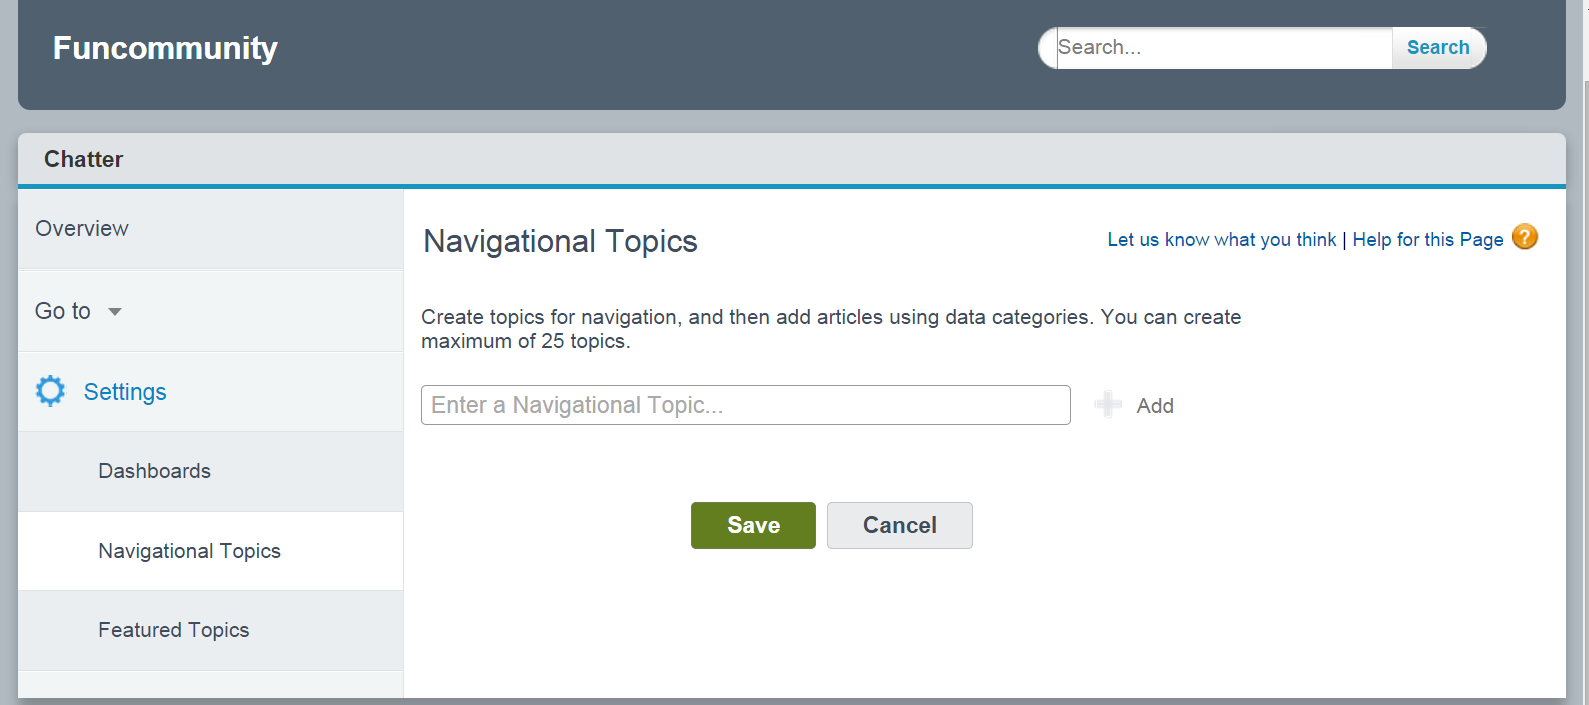
Got to Community Setup shown as above and you will see salesforce settings screen similar to
one shown below


Bind Topics

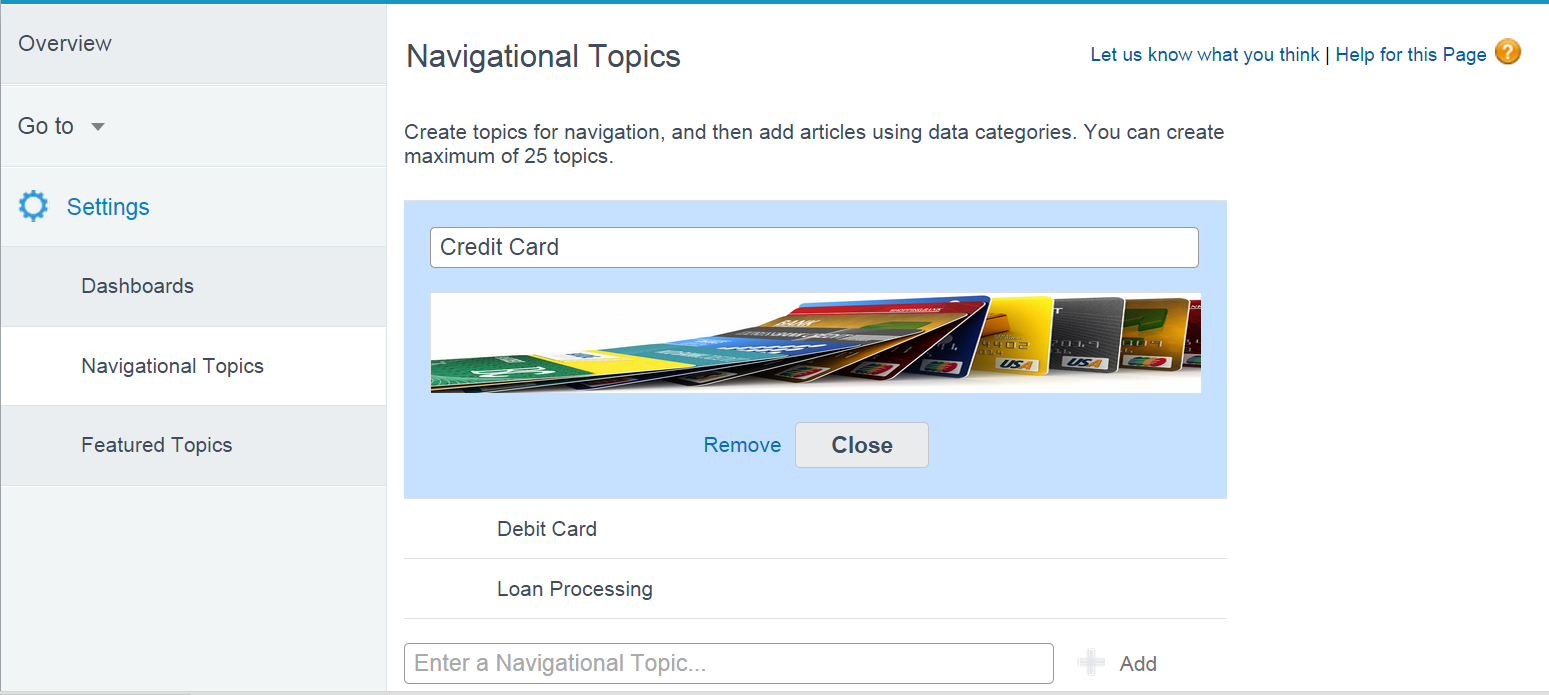
Go to (Setup -> Topics -> Topics for Objects) to bind topics to every knowledge article. Clearly, this make it easier to locate or navigate in the community


Screen shot below explains, how to add banner images for each topic. I have created three topics for here to demonstrate, Credit Card, Debit Card and Loan Processing


Assign Data Category


Locate arrow on top-right, to assign data-category for each topic, in the picture below    


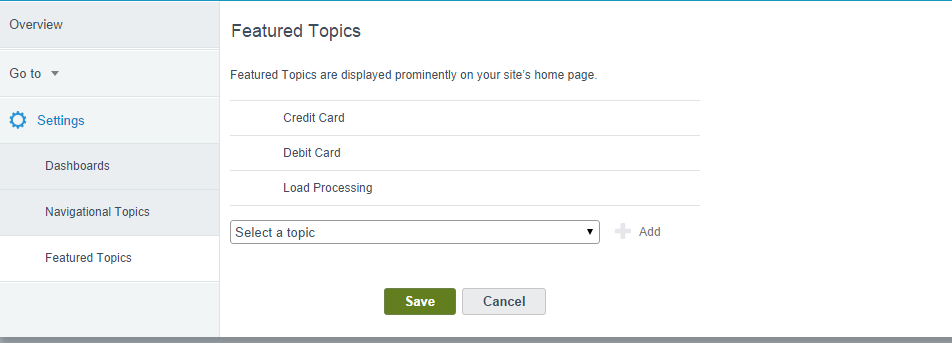
Featured Topics

Every featured topics, pop as thumbnail on homepage, add feature topics here


Video Summary

With that said, you community portal has taken shape with pure configuration and 'no-code' involved. I am compiled these steps in a video and discussed some more feature(s). Feel free to provide us feedback and share your knowledge with us.


Tuesday, 14 October 2014

Journey from blogger To author

Sorry for not being so much active here but I have a strong reason that I am sure you will forgive me .I am excited to inform I was given an opportunity to author a book on explaining administration essentials of Salesforce.com CRM .I have completed the book and I am eager to get some feedback from readers .

It was not easy job working on this after office hours but this was true unique experience and challenge .

Who This Book Is For

This book is targeted at expert administrators or professionals who are new to Salesforce and want to learn the various features supported by the platform in a short space of time. The book can also be used by professionals preparing for Developer and Administrator certification exams from Salesforce.

What You Will Learn


  1. Understand how licensing, profiling, and security settings are set for users
  2. Perform data modeling and use Salesforce components such as workflows, approvals, validations, layouts, and record types to solve business problems
  3. Get to know the reporting basics and use Salesforce analytics to build reports and dashboards
  4. Troubleshoot common challenges that administrators face in real-time businesses
  5. Get to grips with the Sales Cloud and Service Cloud features provided by the platform
  6. Utilize tools such as the data loader to load data into Salesforce
  7. Load data using an external ID and understand the importance of Excel VLOOKUP
  8. Get familiar with the overall administrator responsibilities for real-time applications

salesforce is one of the leading platforms for developing cloud-based applications. Primarily, Salesforce is designed for managing the sales processes of an organization, but the platform can be leveraged to develop custom applications. It runs on the Force.com platform. With the advantage of having reduced development costs, we can deliver applications in a very short time span. With this book, administrators will learn to tackle a lot of things that pop up in their daily routine.

This book is a comprehensive guide that explains user management, profile management, and the basic building blocks of an application. The book proceeds by explaining the troubleshooting skills needed for an administrator. The best practices and disciplines of data loading are discussed in detail. The book concludes with an overview of sales and service cloud features so that the reader is ready for the advanced configurations of this module. By the end of the book, you will be a competent administrator who can manage and maintain the Salesforce data of your organization successfully.

To get a sample chapter you can visit below link


You can also purchase both ebook as well as printed version from amazon or packtpub.

Would love to get some feedback on how this book is and remember this is for people who have just started using salesforce CRM and are completely new 


Sunday, 7 September 2014

Invoking Apex Callouts through Visual Flows

Few weeks back I was attending a Webinar on Advanced Flow From SFDCBill(Product Manager Flows Salesforce.com) .I was quite surprised to discover flows are very powerful feature provided by the platform for the administrator to configure the business logic .

My friend Rakesh has been blogging lot of use cases of flows for Salesforce 1 and using chatter objects .You can refer his blog for more details on the work he has done .I have learned lot from those and I am thankful to him for sharing his experience with visual flows through his blog


http://rakeshistom.wordpress.com/category/workflow-rule/visual-workflow-flow/


One of the things that came was invoking callouts or webservices through flows and SFDCBill was able to communicate the design that one needs apex and process plugin for invoking callouts directly from the flow .I did a quick online search to see if this has been demonstrated  and was not able to get some good resource so i thought of sharing a sample tutorial on how to invoke callouts from flows directly.

The more information on the process plugin can be obtained from below URLs ,

https://www.salesforce.com/us/developer/docs/apexcode/Content/apex_process_plugin.htm
https://www.salesforce.com/us/developer/docs/apexcode/Content/apex_process_plugin_example_lead_convert.htm

The Process plugin is an apex Interface and that needs to be implemented in order to pass request into the apex class from the flow input or screen and the apex interface returns the response back to the flow.

Lets discuss how we can make a web service or apex callouts from flow directly .

1)Our first step will be to write the apex plugin class that makes a webservice callout to external website and process and makes the data ready for passing back to the flow.

For webservice part I have taken a sample REST service provided for free for learning purpose from the website http://api.wunderground.com/weather/api/

The web-service takes input of state and city of US and outputs current weather condition in the form of JSON objects .Note that you need to sign up and generate an API key for your use .

The input of state and city can be taken from flow screen and it can be passed directly as request parameter to the apex class .

Here is the complete apex class for the flow plugin


2)For JSON parsing ,I have used another class shown below ,which handles parsing of the data .This can be easily generated using https://json2apex.herokuapp.com/ by providing sample response JSON.

Lets dig into the creation of flows ,

Visual workflow basics can be studied from following resources 

http://help.salesforce.com/help/pdfs/en/salesforce_vpm_implementation_guide.pdf
http://www.salesforce.com/us/developer/docs/workbook_vf/workbook_vf.pdf

3)We will need below three components 

i))Input Screen to take data of city and state from User need as input for our webservice
ii)WeatherAppApex Plugin we have just developed using apex
iii)Output Screen to display the result


The input screen will have two fields to capture input 


The Apex Plugin will have a mapping for both input and output from result.The below screen shots show the input and output mappings .Note for output mapping for further usage of output  parameters flow variables are created


The output Screen is last piece to display the results .

Now lets see the outcome of this work in below video


I hope you enjoyed this tutorial and looking forward to your comments below .

Please note error handling in code and Test classes are left as it was just a POC code .Be careful to take care of all these when implementing for client code .

Happy Coding !!!

Sunday, 10 August 2014

Refreshing Parent Window of Inline Visualforce Page from Child Window Opened from Inline Visualforce Page

The problem statement is From Inline Visualforce We need to open a Child window and then from that child window we need to refresh the Parent window of the Child window or redirect Parent window of the child window .

Last night ,I was struggling on how to redirect the Parent Window from the child window that was opened from the Inline window 

I tried hard on how to solve this ,but finally last resort was to post the query on salesforce stackexchange .The below is the link for the same


The error was due to Javascript security of web browser .

I tried the below script on the child window

<script>

  function test(){
     alert('hello');
     window.opener.top.location.href='https://googleflowauth-dev- ed.my.salesforce.com/001900000096agv';
  }

   </script>

Unsafe JavaScript attempt to initiate navigation for frame with URL 'https://googleflowauth-dev-ed.my.salesforce.com/001900000096agv' from frame with URL 'https://googleflowauth-dev-ed--c.ap1.visual.force.com/apex/pagereal'. The frame attempting navigation is neither same-origin with the target, nor is it the target's parent or opener.

The browser security features don't allow navigation from child window directly since visualforce and standard detail page are in different domain.The above error is due to the same feature .

Stackexchange has really expert professionals and Eric suggested me the below solution.I am posting the same so that helps others


The Inline page on the parent window has the below code

<apex:page standardController="Account" extensions="Accountctrl">
<apex:form >
 <script>
  function openwindow(){
       window.open("/apex/pagereal", "myWindow", "width=200, height=100");
 }
  function navigate(){
  window.top.location.href='https://googleflowauth-dev-ed.my.salesforce.com/001900000096agv';//Parent function that redirects
  }
 </script>
<apex:pageBlock >
 <apex:pageBlockSection columns="1" id="Test" >
  <apex:inputcheckbox value="{!test.istest__c}" label="Same as Above">
    <apex:actionSupport event="onchange" rerender="Test" />
</apex:inputcheckbox>
<apex:outputPanel rendered="{!NOT(test.istest__c)}"> 
<apex:inputField value="{!test.Campaign__c}" />
<apex:inputField value="{!test.cust_vendor__c}" />
</apex:outputPanel>
   </apex:pageBlockSection> 
  </apex:pageBlock>

Note that navigate function we will call from the child window and that would navigate parent frame

<apex:page >
 <!-- Begin Default Content REMOVE THIS -->
 <h1>Congratulations</h1>
 This is your new Page

  <script>

 function test(){
     alert('hello');
     window.opener.navigate();//call the parent function from child window and that does the trick
 }

 </script>
  <apex:form >
 <!-- End Default Content REMOVE THIS -->
  <apex:commandButton onclick="test()" value="Test"/>
  </apex:form>
</apex:page>
The child window script will call the opener  window script and that in turn will redirect the parent frame .

Hope this trick will be useful .

Introducing Lightning Base Components

Lightning Base Components are great addition to the platform and in fact revolutionary .One of the concerns around lightning component ...