This is a continuation from blog 1 where we had set up sample SQL server on the cloud using windows azure platform .
This article we will be doing below things
1)Writing a Visual C# program to expose the SQL table and data as a Odata webservice(Using WCF template)
2)Deploy the code on windows azure website
3)Accessing the SQL data using lightning connect using azure website URL
You will need below things as a prerequisite
1)Install Visual studio from the here
2)Open online windows azure management portal that you had set up if you followed last article
3)Salesforce developer instance


Switch back to the Connection Properties dialog in the Visual Studio Entity Data Model Wizard and paste your SQL Database server name into the Server name text box.


Now that you have added an ADO.NET Entity Data Model to your Visual Studio project, you need to add a WCF Data Service.


Click for larger image


This article we will be doing below things
1)Writing a Visual C# program to expose the SQL table and data as a Odata webservice(Using WCF template)
2)Deploy the code on windows azure website
3)Accessing the SQL data using lightning connect using azure website URL
You will need below things as a prerequisite
1)Install Visual studio from the here
2)Open online windows azure management portal that you had set up if you followed last article
3)Salesforce developer instance
1)Create an OData Web Service
You now have a SQL Database in Windows Azure with tables and data, but now you need a simple and unified way to query and manage that data from all of the applications that you will build. Web services provide an abstraction over your data storage technology and with the broad adoption of web technologies and HTTP, RESTful web services are accessible from pretty much every platform and device. As a result, in this section you will create an OData web service using ASP.NET, an ADO.NET Entity Framework Data Model and a WCF Data Service.
To begin, open Visual Studio.
From the File menu, hover over New and select Project.
In the New Project dialog, browse to Installed > Templates > Visual C# and select the ASP.NET Web Application project template.
Enter WebApplication5 for the Project Name.
Enter WebApplication5 for the Solution name.
Enter WebApplication5 for the Solution name.
Click the OK button to continue creating your new Visual Studio project and solution. You will now be presented with the New ASP.NET Project dialog. For this OData project select the Empty ASP.NET template and click OK to continue.
Your new Visual Studio solution and project should now be displayed in the Visual Studio Solution Explorer.
In the Solution Explorer, right click on the WebApplication5 project and select Add > New Item…
Browse to Installed > Visual C# > Data and select ADO.NET Entity Data Model.
Enter ShoppingListModel in the name for ADO.NET Entity Data Model and click Add.
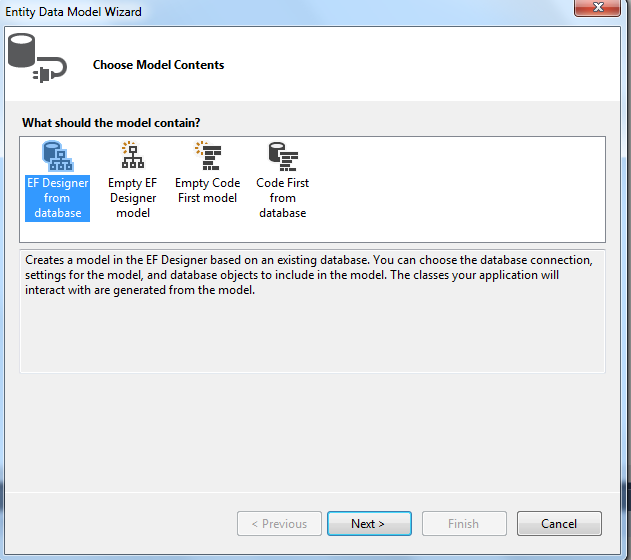
You will now be presented with the Entity Data Model Wizard. In the Entity Data Model Wizard, select Generate from database and click Next.
On the Choose Your Data Connection screen of the Entity Data Model Wizard, click on the New Connection button to display the Connection Properties dialog and configure the connection to your Windows Azure SQL Database.
In your web browser, navigate to the Windows Azure Management Portal at http://manage.windowsazure.comand browse to your MyShoppingList SQL Database home screen.
On this screen you will see your SQL Database server name at the bottom. Select your server name and copy it to your clipboard. Your SQL Database server name will look like yourserver.database.windows.net,1433.
Switch back to the Connection Properties dialog in the Visual Studio Entity Data Model Wizard and paste your SQL Database server name into the Server name text box.
Select Use SQL Server Authentication and enter your SQL Database User name and Password.
Expand the Select or enter a database name drop down and select your MyShoppingList database.
Click the OK button to finish configuring your SQL Database connection and return to the Entity Data Model Wizard.
Select the Yes, include the sensitive data in the connection string option and name your entity connectionShoppingListEntities in the text box at the bottom.
Click the Next button to advance to the Choose Your Database Objects and Settings screen.
In the Choose Your Database Objects and Settings screen, check the Tables check box to include all of the tables in the data model.
Enter ShoppingListModel in the Model Namespace text box and click the Finish button.
Now that you have added an ADO.NET Entity Data Model to your Visual Studio project, you need to add a WCF Data Service.
Right click again on the WebApplication5 project in the Solution Explorer and select Add > New Item…
In the Add New Item dialog, browse to Installed > Visual C# > Web and select WCF Data Service 5.6. Name the new WCF Data Service ShoppingListService and click Add.
WCF Data Services make it easy to create an OData service using an ADO.NET Entity Data Model by providing a generic DataService class that is constructed using an ADO.NET Entity Data Model.
Open the ShoppingListService.svc and locate the first TODO comment in the ShoppingListService class definition.
Change /* TODO: put your data source class name here */ to ShoppingListEntities. This change will setup your OData service. The only remaining thing to do is grant access to the entities exposed in the OData service.
Locate and uncomment the following line of code in the ShoppingListService.InitializeService method and change MyEntityset to *. This will grant read permissions to all entities in your OData service.
- // config.SetEntitySetAccessRule("MyEntityset", EntitySetRights.AllRead);
Now you can test your OData service. Right click on ShoppingListService.svc in the Visual Studio Solution Explorer and select View in Browser.
You should now see the following AtomPub feed in your browser. This is the metadata listing the entities that are available in your OData service using the AtomPub web standard.
Click for larger image
Your OData service is now ready to be published to Windows Azure!
2)Publishing Your OData Service to Windows Azure
In your browser, navigate to the Windows Azure Management Portal and click on Web Sites in the list of services on the left-hand side.
Click the New button in the toolbar at the bottom. In the New menu that is displayed, select Compute > Web Site > Quick Create.
Enter a URL for your OData service in the URL text box. You should choose a URL that is relevant and descriptive. Since you are creating a web site for your OData service, you might want to append Api or Serviceto the URL.
Click the Create Web Site checkmark to create your website.
Note: To avoid bandwidth charges and added latency for the transfer between data centers, it would be a good practice to create your web site in the same region as your SQL Database.
After your website has been successfully created, select your web site and download the publishing profile by clicking on the Download the publish profile link.
After your publish profile is downloaded, switch back to Visual Studio and right click on yourCodeGuru.eSeminar.OData project and select Publish…
The Publish Web wizard will be displayed and you can begin publishing your OData service to Windows Azure.
On the Profile screen of the Publish Web wizard, click the Import… button to display the Import Publish Profiledialog.
On the Import Publish Profile dialog, select the Import from a publish profile file option and click the Browse button. Browse to the Publish Profile you downloaded from your Web Site in the Windows Azure Management Portal, select it and click OK to return to the Publish Web wizard.
You will notice that the Publish Web wizard has populated all of the Web Deploy configuration using the Publish Profile file that you downloaded from the Windows Azure Management Portal. Click the Publish button and your OData service will be published to your Windows Azure Web Site.
When your Publish has successfully completed, browse to your OData service at http://YourODataSite.azurewebsites.net/ShoppingListService.svc to verify that your service is accessible and returning the AtomPub feed that with your entities.
Below is the code sample in C# that generated the Odata webservice
3)Configuring Lightning Connect to pull data into salesforce
I wont be elaborating much as it is highlighted on how to configure in below blog
Let me put a simple Video demoing this real time data sync


Examsvce Give validate CIA VCE Exam Dumps Everyday to keep the Questions and Answers up-to-date.
ReplyDelete