Last post we discovered how to create our first Analytics cloud report from the dataset .This post will show how to create interactive dashboards using Analytics cloud platform. This will be again step by step tutorial assuming developer or data team has created Dataset for us to build reports and Dashboards . Business Scenario -Need an Interactive Dashboard which will show Revenue generated from opportunity grouped by Account and left Panel will be a list showing different fiscal quarter and based on selected quarter results will auto filter out Step 1-Create a report for the Chart with opportunity Amount and GROUP BY Account Name i)Search for opportunity dataset
ii)Create a sample report with Measure as Sum of Revenue and Group as Account Name
iii)Clip this report .Note this is a very important step when you are building a dashboard
The above screenshot shows the clipper highlighted in RED colors.
iv)A new tab will open and shows as "New dashboard"
Step 2-Create Second report with Fiscal quarter as GROUP BY and COUNT as Measure
i)Switch to the opportunity tab and create a report with FISCAL quarter GROUP BY and clip it as well
Make sure to clip this and make sure dashboard screen shows both the reports
Step 3-Select List as dashboard type
i)Once you select list the screen is as displayed below
Click on 2nd report and this will automatically add to the list .
Rearrange and remove the selected measure field and keep it none .
ii)Select the chart type now and add 1st created report by clicking on the first created report
Once you have all ready your screen is as below
Click on the green button at extreme right to run this
I remember couple of years back when I had to integrate Sharepoint with Salesforce ,only option I could think of is to visit appexchange and pay some bugs to get this up and running.There was a free app "Chatter For Sharepoint".Configuring this was again scanning through lot of documents .
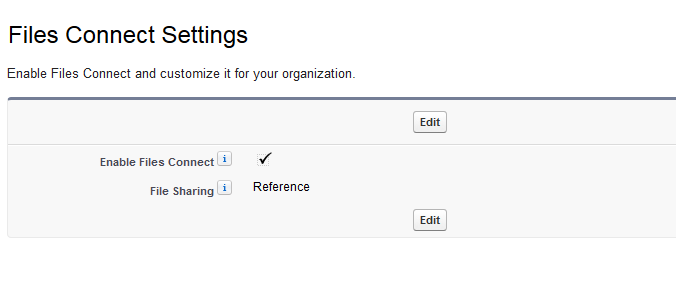
File Connect lets you connect Microsoft SharePoint 2010, SharePoint 2013 or SharePoint Online account, and everything is indexed and made searchable within your Salesforce environment.File connect is not just about sharepoint and in general its about sharing salesforce files outside salesforce organization.
In this blogpost I will walk through simple steps to connect Microsoft 365 Sharepoint to Salesforce Files and bring Files located in sharepoint to SFDC. It won't be too detailed as salesforce documentation around this is awesome but will add necessary Screenshot to help folks who want to set quick demo for clients to showcase.
Step 1-Sign Up for a trial account from microsoft for online sharepoint .Office 365 trial edition will work well .
Step 2-Select a sample site for sharepoint and try accessing this site .Note URL as this URL we will be using lot throughout configuration.
Also note microsoft domain as this will be used as well for further configuration.The below shows how your admin console look and you can navigate and select and activate a sharepoint site .
On successful authentication click validate and sync button .
Step 7-Associate External data source with Permission set
Debugging tips
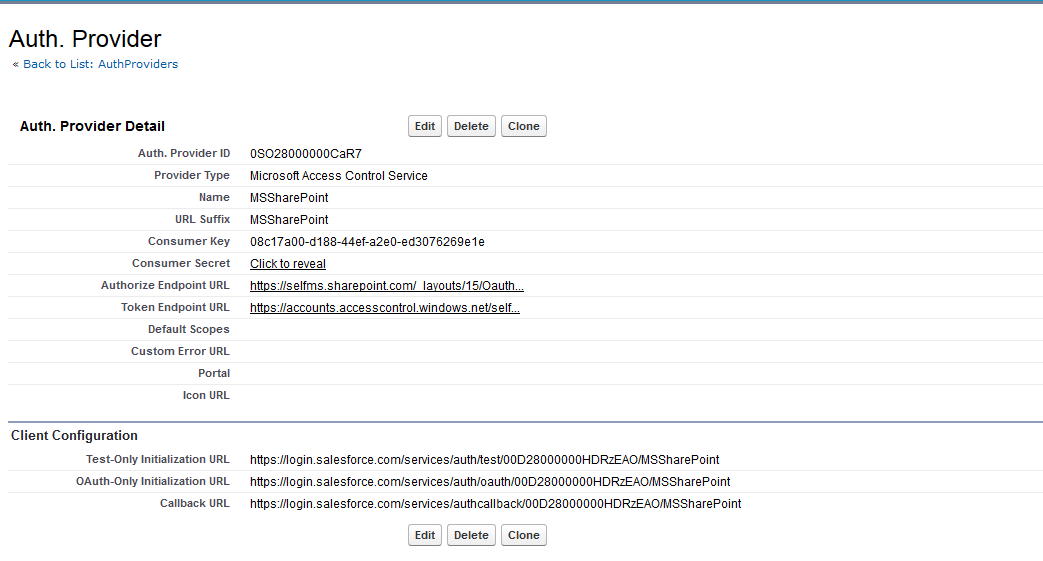
1)If oauth is failing double check auth provider configuration and domains entered in sharepoint settings .
2)If permission issues check permission sets and users are assigned .Also chatter for sharepoint is enabled for user or at profile level user is assigned valid permission.
Our final finished integration will look as below
Great thing is global search will search from sharepoint as well as chatter files
Hope you enjoyed and Let me know if anyone is encountering any issue in getting this to work .
Analytics cloud is a new Business Intelligence platform for creating interactive reports and dashboards .
This product has been launched and for more info around this product you can refer below link Analytics Cloud Overview Video
As an Enterprise customer you need to be aware of product limitations and products offerings and I don't work for salesforce and hold no responsibility in this regard and want to set expectation that whatever I am documenting in blog series is my personal take and thoughts . Understanding analytics cloud and Training Programs Offered From Salesforce
Remember that its simple to learn and understand the tool if you come from Business Intelligence world since you are already familiar with lot of concepts and theory needed for building charts and graphs .If you are not familiar there are lot of fundamental level trainings from Salesforce on this.Remember you can access this training if you are partner organization to salesforce through your organization partner portal 1)Analytics Cloud Whitebelt Training
This training is delivered in form of webinar of very short duration that covers product offerings and release plans and an overview of technology under the hood .This is good to go through before we go ahead and take green belt . 2)Analytics Cloud Green-Belt Training
This is comprehensive training and covers lot of theoretical concepts of BI world.Some of the topics you will get familiar with this is listed below
How analytics cloud differ from Salesforce 1 native reporting
Traditional BI products Pros and Cons
Who will use this analytics cloud (Concept of Explorer and Builder)
Role of ETL in Traditional BI
OLTP and OLAP concepts
Analytics cloud architecture
Facts and Dimensions
Datasets
Concept of Cardinality
It has examples around creating reports and dashboards from Datasets
3)Brown Belt Training
This is in person classroom training from the salesforce Product Team and Instructors who walk through the product offerings and provides opportunity for hands on exercises around the tool.
Please note all this are offered if you are a Partner Organization to salesforce.
Creating My First Analytics Cloud Report
My experience on creating the reports using the tool was really amazing .I never thought with so much of huge data rows you can draw reports and dashboards so quickly with minimal pain .
Since I have a sample training org with me I will walk you on how to create a simple report from a dataset .
Remember that a dataset is not only salesforce data ,but it can consist data from different sources .I will blog separately on how developers or builders can create datasets for business consultants .So we assume we already have dataset created from developers and data team for you as a business consultant to start drawing report .Also I assume you have org with analytics cloud enabled and analytics cloud license assigned through permission set.
The above is the first screen you will see once you select Analytics app from the salesforce set up.
Lets select Datasets and draw a simple report from opportunity dataset .The Search text box is a search that will list various options
Click on the opportunity Cube or dataset and you should see a horizontal line showing no of rows of data in the dataset collection as below
The interface has three Items to pay attention and once we master those we are really good to go
1)Measure :This will include for facts the ability to count while for dimensions the ability to SUM,AVERAGE ,MIN or MAX
2)Group:The data can be grouped using this and including multiple will further subgroup
3)Filter:This is used to filter the result set and one can include multiple filters with various fields of datasets
Let say we need sum of Amount for each opportunity ,we will just need to group by opportunity name and in the measure column its SUM of AMOUNT .
You can use extreme right corner arrow menu to save to a private app folder or in your public folder and share this in salesforce chatter.
I hope you this threw some light about analytics cloud . There is lot to explore and this is just the starting .
Again please note this is my personal opinion and anything you found interesting contact salesforce executives to get more info.
This is a continuation from blog 1 where we had set up sample SQL server on the cloud using windows azure platform . This article we will be doing below things 1)Writing a Visual C# program to expose the SQL table and data as a Odata webservice(Using WCF template) 2)Deploy the code on windows azure website 3)Accessing the SQL data using lightning connect using azure website URL You will need below things as a prerequisite 1)Install Visual studio from the here 2)Open online windows azure management portal that you had set up if you followed last article 3)Salesforce developer instance
1)Create an OData Web Service
You now have a SQL Database in Windows Azure with tables and data, but now you need a simple and unified way to query and manage that data from all of the applications that you will build. Web services provide an abstraction over your data storage technology and with the broad adoption of web technologies and HTTP, RESTful web services are accessible from pretty much every platform and device. As a result, in this section you will create an OData web service using ASP.NET, an ADO.NET Entity Framework Data Model and a WCF Data Service.
To begin, open Visual Studio.
From the File menu, hover over New and select Project.
In the New Project dialog, browse to Installed > Templates > Visual C# and select the ASP.NET Web Application project template.
Enter WebApplication5 for the ProjectName. Enter WebApplication5 for the Solution name.
Click the OK button to continue creating your new Visual Studio project and solution. You will now be presented with the New ASP.NET Project dialog. For this OData project select the Empty ASP.NET template and click OK to continue.
Your new Visual Studio solution and project should now be displayed in the Visual Studio Solution Explorer.
In the Solution Explorer, right click on the WebApplication5 project and select Add > New Item…
Browse to Installed > Visual C# > Data and select ADO.NET Entity Data Model.
Enter ShoppingListModel in the name for ADO.NET Entity Data Model and click Add.
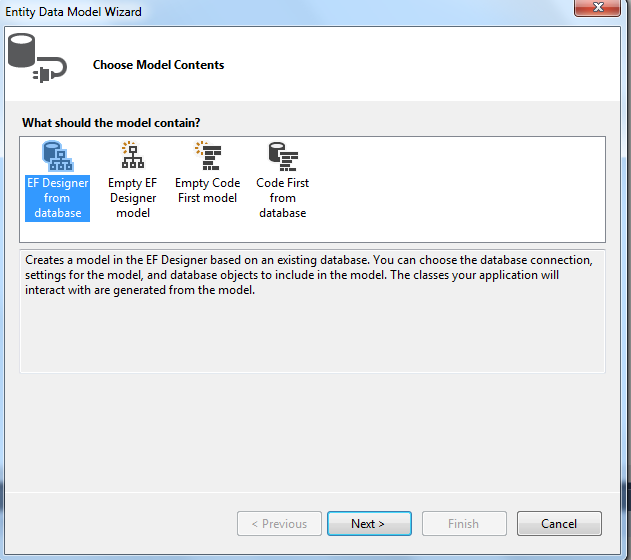
You will now be presented with the Entity Data Model Wizard. In the Entity Data Model Wizard, select Generate from database and click Next.
On the Choose Your Data Connection screen of the Entity Data Model Wizard, click on the New Connection button to display the Connection Properties dialog and configure the connection to your Windows Azure SQL Database.
In your web browser, navigate to the Windows Azure Management Portal at http://manage.windowsazure.comand browse to your MyShoppingList SQL Database home screen.
On this screen you will see your SQL Database server name at the bottom. Select your server name and copy it to your clipboard. Your SQL Database server name will look like yourserver.database.windows.net,1433.
Switch back to the Connection Properties dialog in the Visual Studio Entity Data Model Wizard and paste your SQL Database server name into the Server name text box.
Select Use SQL Server Authentication and enter your SQL Database User name and Password.
Expand the Select or enter a database name drop down and select your MyShoppingList database.
Click the OK button to finish configuring your SQL Database connection and return to the Entity Data Model Wizard.
Select the Yes, include the sensitive data in the connection string option and name your entity connectionShoppingListEntities in the text box at the bottom.
Click the Next button to advance to the Choose Your Database Objects and Settings screen.
In the Choose Your Database Objects and Settings screen, check the Tables check box to include all of the tables in the data model.
Enter ShoppingListModel in the Model Namespace text box and click the Finish button.
Now that you have added an ADO.NET Entity Data Model to your Visual Studio project, you need to add a WCF Data Service.
Right click again on the WebApplication5 project in the Solution Explorer and select Add > New Item…
In the Add New Item dialog, browse to Installed > Visual C# > Web and select WCF Data Service 5.6. Name the new WCF Data Service ShoppingListService and click Add.
WCF Data Services make it easy to create an OData service using an ADO.NET Entity Data Model by providing a generic DataService class that is constructed using an ADO.NET Entity Data Model.
Open the ShoppingListService.svc and locate the first TODO comment in the ShoppingListService class definition.
Change /* TODO: put your data source class name here */to ShoppingListEntities. This change will setup your OData service. The only remaining thing to do is grant access to the entities exposed in the OData service.
Locate and uncomment the following line of code in the ShoppingListService.InitializeService method and change MyEntityset to *. This will grant read permissions to all entities in your OData service.
Now you can test your OData service. Right click on ShoppingListService.svc in the Visual Studio Solution Explorer and select View in Browser.
You should now see the following AtomPub feed in your browser. This is the metadata listing the entities that are available in your OData service using the AtomPub web standard.
Click for larger image
Your OData service is now ready to be published to Windows Azure!
2)Publishing Your OData Service to Windows Azure
In your browser, navigate to the Windows Azure Management Portal and click on Web Sites in the list of services on the left-hand side.
Click the New button in the toolbar at the bottom. In the New menu that is displayed, select Compute > Web Site > Quick Create.
Enter a URL for your OData service in the URL text box. You should choose a URL that is relevant and descriptive. Since you are creating a web site for your OData service, you might want to append Api or Serviceto the URL.
Click the Create Web Site checkmark to create your website.
Note: To avoid bandwidth charges and added latency for the transfer between data centers, it would be a good practice to create your web site in the same region as your SQL Database.
After your website has been successfully created, select your web site and download the publishing profile by clicking on the Download the publish profile link.
After your publish profile is downloaded, switch back to Visual Studio and right click on yourCodeGuru.eSeminar.OData project and select Publish…
The Publish Web wizard will be displayed and you can begin publishing your OData service to Windows Azure.
On the Profile screen of the Publish Web wizard, click the Import… button to display the Import Publish Profiledialog.
On the Import Publish Profile dialog, select the Import from a publish profile file option and click the Browse button. Browse to the Publish Profile you downloaded from your Web Site in the Windows Azure Management Portal, select it and click OK to return to the Publish Web wizard.
You will notice that the Publish Web wizard has populated all of the Web Deploy configuration using the Publish Profile file that you downloaded from the Windows Azure Management Portal. Click the Publish button and your OData service will be published to your Windows Azure Web Site.